|
|
|
Nokia 9210 Communicator Resource Site-Setting Up- |
||
|
|
|
home >
Setting Up
This page contains guides to setting up the more complex features of the 9210.
Syncing the 9210 with a PCThe software for syncing the 9210 with a PC is contained on the CD-ROM which shipped with the 9210. This software, called "PC suite" can be installed through the interactive menu which auto-runs when you insert the CD. When asked to choose between IrDa or cable syncing it is recommended to choose IrDa if you are installing the software on a laptop (as this makes syncing on the move easier and quicker) and cable if you are syncing with a desktop PC (as cable offers faster transfer rates). Once the software is installed it can be customised to the users preference. There are various sections of the PC Suite that can be customised: Task Scheduler
To choose which tasks will run and to define their properties select "Task Scheduler" from the pane down the left
(fig. 1). fig. 1.1 shows which tasks are selected for execution, fig. 1.2 shows which
tasks will run automatically and fig. 1.3 shows when the task will run(only while device is connected).
Note
Control Panel
The control panel allows you to specifiy advanced options for tasks, connecting to the 9210 and other features.
Copy Anywhere is a utility that runs in the task bar when a connection to the 9210 is detected
and allows you to copy text and other objects such as pictures directly to and from the PC to the 9210. The
CopyAnywhere icon in control panel allows you to specify properties of the CopyAnywhere feature.
The connection icon allows you to specify the port which the 9210 will connect to (i.e. COM1, COM2, IrDa etc.).
The Data Location icon allows you to specify where the archive data will be held (see Archive Manager section).
Converison Settings allows you to specify what PC compatible file formats office files will be converted into.
Device Manager is useful if more than one 9210 connects to the PC as it allows you to manage profiles for each
9210.
Archive Manager
Archive manager manages all the backup data of the drives in the 9210. Using Archive manager you can either restore
a single file backup to the 9210 or restore the entire drives contents. This is useful if data is lost or corrupted.
There is no set method or facility for creating an Internet account on the 9210. From personal experience I found
the best way to set up an account for the 9210 is by creating a standard ISP (Internet Service Provider)
account using a PC, or copy the details from an existing account onto the 9210.
To obtain ISP account details from a windows PC you need to view the dial up properties for that account.
To access dial up properties under Windows 9x and NT:
To access dial up propeties under Windows XP and 200:
Note
Copying the account details the 9210
To enter the account details into the 9210 press Extras, select Internet startup and then select
Internet access.
Once the account has been created you need to set it as the default.
Setting up an e-mail account on the 9210 is very similar to the procedure used to set up an Internet account. There
is no set method or feature for setting up an e-mail account and so I recommend using an exisiting account or setting
up a new one using a PC.
Gaining access to your e-mail account details varies depending on which e-mail client you use. To access your e-mail
account details in Microsoft Outlook Express click tools from the menu bar, click accounts, click the desired e-mail
account, select properties and then select the servers tab.
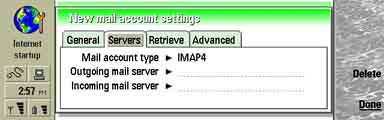
Copying the account details to the 9210
Once the account detials have been obtained you need to input them into the 9210. Press Extras, select Internet
startup and then select Mail account.
The details of the e-mail servers (fig. 1) are entered in the Servers tab.
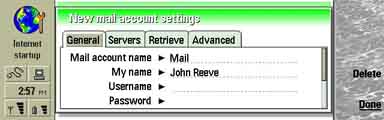
The user name and password (fig. 2) are entered in the General tab. |